Firmware Tutorial: Dance - Part I
Today we are going to write some code to make Robot Butterfly dance in response to the accelerometer! When we tilt the robot left or right, the corresponding servo will move and the neopixels will animate.
We will do this by implementing a callback function for the IMU pose, and adding servo and light animations. We'll add some additional logic to make it a smooth experience.
There are 3 parts to this tutorial: Part I, Part II, Part III. For the complete code, click here.
The biggest piece to know ahead of time is that learning by doing is a great way to learn programming, and that there will be a lot of errors in the process. If you're stuck and not sure of something, try to not dwell on it too long and keep moving - try something out, see what the compiler says, ask Erin any questions. Most of all, don't be discouraged by inevitable compiler errors!
Let's get started!
1. Tools Setup
Just like tools for assembling the hardware, we will need to set up some tools for the software.
Arduino IDE
Download the Arduino IDE for your system here.
ESP32 Board Support Package
In the Arduino IDE boards manager (Tools > Board > Board Manager), search for esp32. Under esp32 by Espressif Systems, choose 2.0.4, and install it.
Robot Butterfly Library
In the Arduino IDE library manager (Tools > Manage Libraries), search for robotbutterfly. Press install. A window will ask to install library dependencies, select install all.
Adjust Upload Settings
Select Tools > Board > esp32 > ESP32 Dev Module
Select Tools > CPU Frequency > 80 MHz (WiFi/BT)
Select Tools > Upload Speed > 115200

2. Boilerplate
Let's start by making a new sketch (File > New Sketch). Now, let's copy and paste this boilerplate code into the editor. The term 'boilerplate' means a pre-made template that can be re-used in multiple projects.
#include <RobotButterfly.h>

RobotButterfly robotbutterfly;

void setup() {
  Serial.begin(9600);
  robotbutterfly = RobotButterfly();

  // start up robot butterfly with some settings:
  // 1st param true = library will initialise the servos automatically
  // 2nd param true = library will increment state machine on button click automatically
  robotbutterfly.init(true, false);

  Serial << "Welcome to Robot Butterfly!" << endl;
  playSound(SOUND_ALERT_STARTUP);

}

void loop() {

  robotbutterfly.update();

}
Here is what is happening:
- Importing the Robot Butterfly library and declaring the object
- Inside of setup - initialising the robot butterfly object, playing a sound when complete
- Inside of setup - starting the serial port at 9600 baud. This will let us see output text on the console
- When initialising the robot butterfly object, we set the first parameter as true for the library to handle the servo initialisation, but we set the second parameter as false since there will not be a state machine used in this program
- Inside of loop - continuously updating the robot butterfly object
3. Declarations
We'll need two variable declarations. Add these at the top, right after the line RobotButterfly robotbutterfly;
void imuPoseChangeCallback(uint8_t p);
long last_movement_rest = 0;
Here is what is happening:
- Declaring a function prototype forvoid imuPoseChangeCallback(uint8_t p);, so that the compiler knows of this function when we set it as the callback.
- Declaring a signed long integer that will be used for a millisecond timestamp long last_movement_rest = 0;.
4. Setup
There's some work to get done before Robot Butterfly begins its behaviours. We can do that inside the initial setup function. The setup function is only run once upon startup.
Add these lines, right after the line robotbutterfly.init(true, false);
robotbutterfly.onPoseChangeCallback_client = imuPoseChangeCallback;

pinMode(LED_HEARTBEAT_PIN, OUTPUT);
pinMode(LED_COMMS_PIN, OUTPUT);

setAnimations();
setTaskPriorities();
Here is what is happening:
- Setting the callback function that the library will call when there has been a change in position detected by the IMU.
- Setting the two LEDs to be outputs. The pin numbers are already defined in the library's Board.h file.
- Calling a function named setAnimations.
- Calling a function named setTaskPriorities.
5. Set Animations
Time to make our first function! Set Animations will initialise the animations for both the servos and neopixels so they are ready to go for future use.
Add this function to the bottom, after the closing } of loop.
void setAnimations() {

  // servo animation home
  setServoAnim(&servo_animation_home, SERVO_ANIM_POSITION, SERVO_ANIM_HOME);
  setServoAnimPositionLeft(&servo_animation_home, SERVO_ANIM_POSITION_UP);
  setServoAnimPositionRight(&servo_animation_home, SERVO_ANIM_POSITION_UP);
  startServoAnim(&servo_animation_home);

  // servo animation alert
  setServoAnim(&servo_animation_alert, SERVO_ANIM_NONE, SERVO_ANIM_ALERT);
  startServoAnim(&servo_animation_alert);

  // neo animation home
  setNeoAnim(&neo_animation_home, NEO_ANIM_SQUIGGLE, NEO_ANIM_HOME);
  setNeoAnimColours(&neo_animation_home, NEO_GREEN, NEO_PURPLE);
  setNeoAnimDuration(&neo_animation_home, 500);
  startNeoAnim(&neo_animation_home);

  // neo animation alert
  setNeoAnim(&neo_animation_alert, NEO_ANIM_NONE, NEO_ANIM_ALERT);
  startNeoAnim(&neo_animation_alert);

}
Here is what is happening:
- There are two categories of animations: home and alert. Alerts can 'interrupt' home animations, and alerts are usually time limited.
- Both of these categories of animations exist for both servos and neopixels.
- Setting basic home animations for both the servos and neopixels.
- Setting the alert animations to none, making it ready for the future.
6. Set Task Priorities
The next function to add is about setting the task priorities. Robot Butterfly has a task for each peripheral. This example primarily uses the IMU, servos, and neopixels. We can set the task priorities accordingly to give the most resources to those peripherals that we will use the most.
Add these lines, right after the closing } from the function in the previous step.
void setTaskPriorities() {
  setButtonsTaskPriority(PRIORITY_BUTTONS_LOW);
  setIMUTaskPriority(PRIORITY_IMU_MID);
  setNeoAnimationTaskPriority(PRIORITY_NEOANIM_MID);
  setProximityTaskPriority(tskIDLE_PRIORITY);
  setSensorsTaskPriority(tskIDLE_PRIORITY);
  setServoAnimationTaskPriority(PRIORITY_SERVOANIM_HIGH);
  setSoundTaskPriority(PRIORITY_SOUND_MID);
}
Here is what is happening:
- Each task has their own predefined level of priorities. Some are being set to tskIDLE_PRIORITY, which is the lowest setting.
- The IMU, servos, and neopixels get set to a pretty high task priority to give them the most resources.
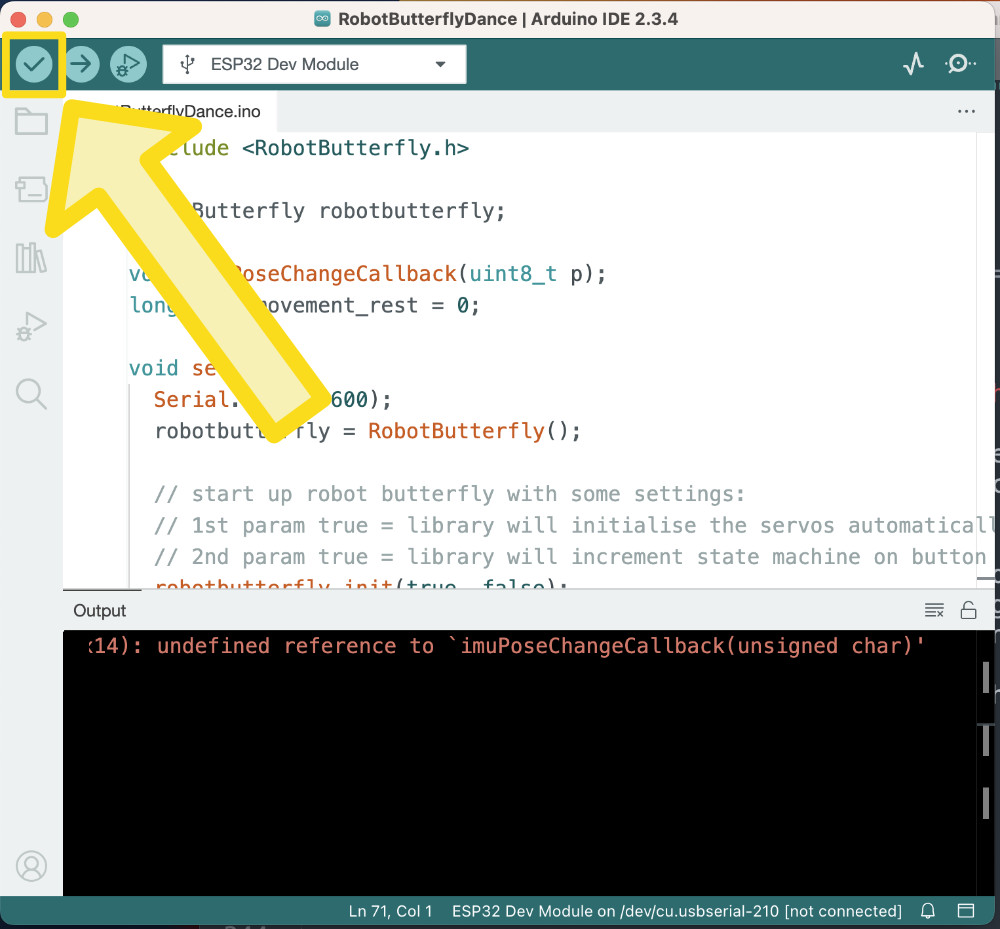
7. Compile
Before venturing further, we should test compile the code to make sure there's no issues! Set the board to the correct values, and press the verify checkmark button.
A good result at this point would be only one error: undefined reference to `imuPoseChangeCallback(unsigned char)'. No need to worry about this yet, since we will be implementing it in Part III.
If there is any other errors however, these should be looked in to and resolved. Have a go and see if you can resolve it, and feel free to ask Erin for any assistance!
Here is what is happening:
- Before the code gets transmitted to the microcontroller, it goes through a process called compilation by the compiler.
- Different programming languages and target systems can have different compilers.
- The compiler reports back any errors, including relating to syntax.
- Be careful though! The compiler does not check logical errors!